Input System (from : Unity Technologies)
Unity 버전 2019.1 이상 버전에서 사용이 가능하다. 기존의 Input과 다르게 좀더 간편해 졌다고 해서
이번에 사용하게 되었다.
Unity Blog 설명으로는 다음과 같다.
'기존의 입력 시스템이 사용자 친화적이지 않으며 때로는 파일을 실행한 후 컨트롤러를 연결을 처리하는 것도 원할하지 않다는 것을 알게 되어서 완전히 새로 구축하게 되었다.`
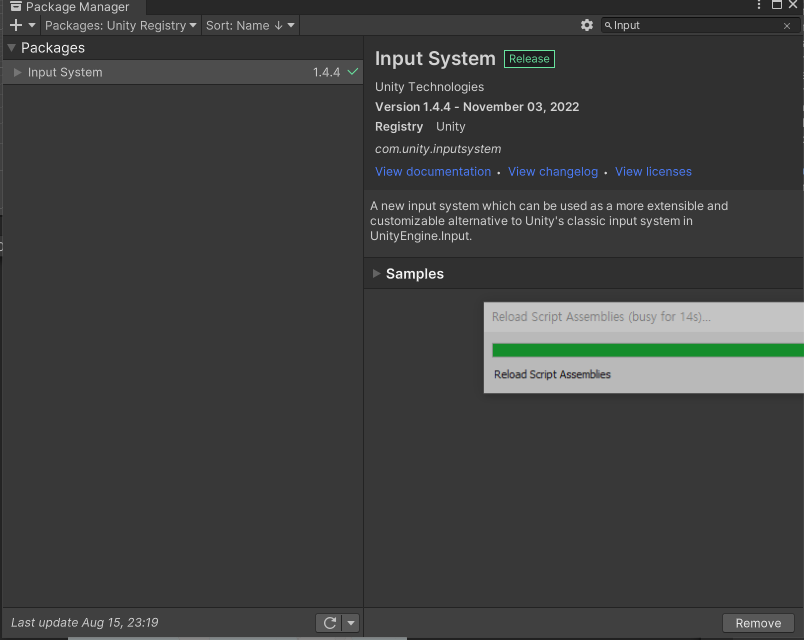
Package Manager에서 Input System을 설치한다.
새로운 입력 시스템을 사용하려면 설정을 변경해야 한다.
Project Setting -> Player-> Active Input Handling 값을 변경해줘야 한다.

여러가지 방법으로 Input System을 처리할 수 있다.
< 코드에서 직접 처리 방식>

using UnityEngine;

public class ExampleClass : MonoBehaviour
{
    public GameObject Player;
    bool player_dead;
    void Update()
    {
       if (Mouse.current.leftButton.wasPressedThisFrame) // returns true when the mouse left button is pressed
      {
            Vector3 mousePos = Mouse.current.position.ReadValue();
            mousePos.z=Camera.main.nearClipPlane;
            Vector3 Worldpos=Camera.main.ScreenToWorldPoint(mousePos);
            if(player_dead)
           {
                 Instantiate(Player, Worldpos, Quaternion.identity);
           }
       }
    }
}
<스크립트 인스펙터(Insepctor) 바인딩>


using UnityEngine;
using UnityEngine.InputSystem;

// Using embedded actions with callbacks or reading values each frame.

public class ExampleScript : MonoBehaviour
{
    // these embedded actions are configurable in the inspector:
    public InputAction moveAction;
    public InputAction jumpAction;

    public void Awake()
    {
        // assign a callback for the "jump" action.
        jumpAction.performed += ctx => { OnJump(ctx); };
    }

    public void Update()
    {
        // read the value for the "move" action each frame.
        Vector2 moveAmount = moveAction.ReadValue<Vector2>();
    }

    public void OnJump(InputAction.CallbackContext context)
    {
        // jump code goes here.
    }

    // the actions must be enabled and disabled
    // when the GameObject is enabled or disabled

    public void OnEnable()
    {
        moveAction.Enable();
        jumpAction.Enable();
    }

    public void OnDisable()
    {
        moveAction.Disable();
        jumpAction.Disable();
    }
}
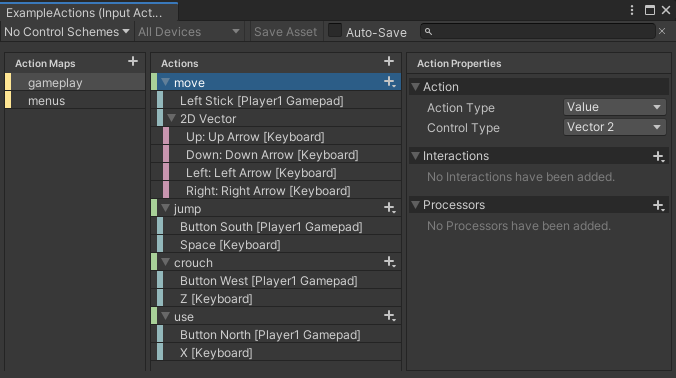
<Action Asset 을 사용한 그룹화 관리>

using UnityEngine;
using UnityEngine.InputSystem;

public class ExampleScript : MonoBehaviour
{
    // assign the actions asset to this field in the inspector:
    public InputActionAsset actions;

    // private field to store move action reference
    private InputAction moveAction;

    void Awake()
    {
        // find the "move" action, and keep the reference to it, for use in Update
        moveAction = actions.FindActionMap("gameplay").FindAction("move");

        // for the "jump" action, we add a callback method for when it is performed
        actions.FindActionMap("gameplay").FindAction("jump").performed += OnJump;
    }

    void Update()
    {
        // our update loop polls the "move" action value each frame
        Vector2 moveVector = moveAction.ReadValue<Vector2>();
    }

    private void OnJump(InputAction.CallbackContext context)
    {
        // this is the "jump" action callback method
        Debug.Log("Jump!");
    }

    void OnEnable()
    {
        actions.FindActionMap("gameplay").Enable();
    }
    void OnDisable()
    {
        actions.FindActionMap("gameplay").Disable();
    }
}

using UnityEngine;
using UnityEngine.InputSystem;

public class DocsExampleActionsAssetCsWrapper : MonoBehaviour
{
    // this field will contain the actions wrapper instance
    ExampleActions actions;

    void Awake()
    {
        // instantiate the actions wrapper class
        actions = new ExampleActions();

        // for the "jump" action, we add a callback method for when it is performed
        actions.gameplay.jump.performed += OnJump;
    }

    void Update()
    {
        // our update loop polls the "move" action value each frame
        Vector2 moveVector = actions.gameplay.move.ReadValue<Vector2>();
    }

    private void OnJump(InputAction.CallbackContext context)
    {
        // this is the "jump" action callback method
        Debug.Log("Jump!");
    }

    void OnEnable()
    {
        actions.gameplay.Enable();
    }
    void OnDisable()
    {
        actions.gameplay.Disable();
    }
}
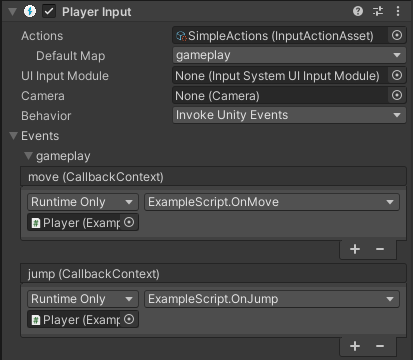
<Component Callback Event>

using UnityEngine;
using UnityEngine.InputSystem;

// This script is designed to have the OnMove and
// OnJump methods called by a PlayerInput component

public class ExampleScript : MonoBehaviour
{
    Vector2 moveAmount;

    public void OnMove(InputAction.CallbackContext context)
    {
        // read the value for the "move" action each event call
        moveAmount = context.ReadValue<Vector2>();
    }

    public void OnJump(InputAction.CallbackContext context)
    {
        // your jump code goes here.
    }

    public void Update()
    {
        // to use the Vector2 value from the "move" action each
        // frame, use the "moveAmount" variable here.
    }

}
< Input Action 실제 사용 하기>
Unity Blog 새로운 입력 시스템 소개 : [링크]
새로운 입력 시스템 소개 | Unity Blog
이번 입력 시스템은 처음부터 사용 편의성, 플랫폼 간 일관성 및 유연성을 염두에 두고 만들었습니다. 향후 Unity 2020.1버전과 함께 릴리스될 예정이며 미리 사용해 보시고 의견을 공유해주시기
blog.unity.com
Input System Quick Start Guide : [링크]
Quick start guide | Input System | 1.0.2
Quick start guide Note: For information on how to install the new Input System, see Installation. Getting input directly from an Input Device The quickest way to get started in script is to read the current state directly from Input Devices. For example, t
docs.unity3d.com
[Unity -Top Paid Package]
[Unity -Top Free Package]
[Unity -New Asset Package]
★★★★☆
'개발 > Unity' 카테고리의 다른 글
| Unity)Scene - OverDraw (0) | 2023.08.28 |
|---|---|
| 문제해결)The AnimationClip '팝업이름' used by the Animation component '프리팹' must be marked as Legacy.UnityEngine.Animation (0) | 2023.08.16 |
| Unity) TMP(TextMeshPro) - SubMeshUI 생기는 이슈 (1) | 2023.08.08 |
| Unity) Unity Editor Project 프로젝트 특정 포맷 가져오기(Project Asset 에서 Prefab,Scene 가져오기) (4) | 2023.08.06 |
| Unity) Crash Report (0) | 2023.07.24 |


댓글